
Do you have a handdrawn design that you want to laser-cut, but don’t want to deal with the hassle of converting it to a digital file? Have no fear! The Glowforge is able to take a photo of your hand-drawn designs and convert them into digital files, so that you can go from sketch to cut in a matter of minutes! Follow the steps below, and you’ll have your new laser-cut treasure in no time.
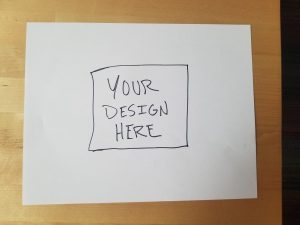
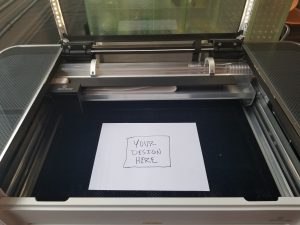
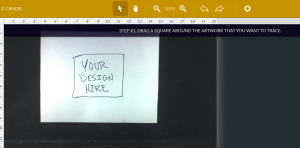
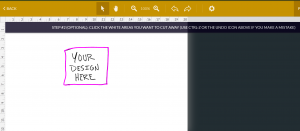
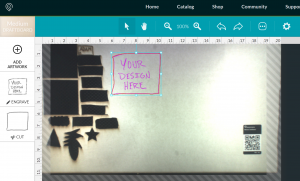
Step 1: Draw Something! The first thing you need to do is draw your design. It could be a new logo for your business, a sketch of your pet rat, or a hand-written letter to send to your grandma for her birthday– it’s up to you! Just draw something! Anything! Step 2: Login to the Glowforge site –> app.glowforge.com Step 3: Turn on the Glowforge (power switch is on the back). Step 4: Place your design in the bed of the laser cutter (see photo). Step 5: On the Glowforge site, click the “Trace” button in the top left corner of the screen. Step 6: The app will ask you to draw a square around the design you want to trace. Step 7: The app will ask you to select any white space you want to remove (this is how you tell the Glowforge you want to cut around the edge of your shape). Once you have clicked the white space, a purple “cut line” will appear around your shape. Make sure it is correct before moving to the next step. Step 8: Press the “Place artwork” button in the top right corner of the screen. Step 9: Remove your hand-drawn design from the bed of the Glowforge, and replace it with the material you want to cut (we recommend using Proofgrade materials). Step 10: Refresh the bed image, by clicking the gear icon on the far-right side of the toolbar and selecting “refresh bed image.” Now you should be able to see your material in the bed. Step 11: Drag and drop your design to wherever you want to place it on the material. You can resize or rotate if needed.
Step 12: If you’re happy with the placement of your design you should be ready to cut. Press the “print” button on the top right corner of the screen. Step 13: Once the Glowforge is ready to cut, the blue print button on the machine will start flashing. Press that button, and let the cutting begin! Once the Glowforge is done cutting you can open the lid and appreciate the beauty of your hand-drawn, laser-cut creation!

Comments