Author Archive

Lulzbot Tutorial: Changing/loading Filament

Hello! Let me guess; you’re here because you want to 3-D print something with the Lulzbot, but it doesn’t have the right filament? Did I guess correctly? If no, I’m not really sure why you’re here… If yes, then keep reading!

The Lulzbot can use a whole bunch of filaments, and swapping them out is super easy! This article will walk you through all of the steps to get your favorite filament loaded and ready to print.

Helpful Hint!

Read HERE to learn about where to purchase different types of filament!

Alright, let’s get started!

Step 1: Preheating. The first thing you need to do is turn on the Lulzbot and preheat the extruder (the extruder tip has to be hot for you to remove or load filament).

  • In Matter Control go to CONTROLS then press PREHEAT (Extruder temp should be at 205 C)

Step 2: Unloading*. Once the extruder is done heating , you can remove the old filament.

*If there is no filament currently loaded, then you can skip this section!

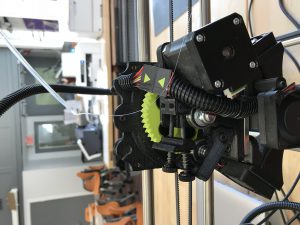
  • Release the spring-loaded clamp that is holding the filament in place

  • Slowly pull up on the filament until it is free from the extruder head

  • Remove the filament from the tube and recoil on the spool

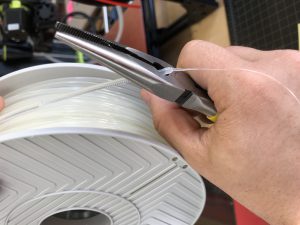
  • Trim the end of the filament; you want to cut the end at an angle

  • Remove the old spool of filament from the Lulzbot and put it away

Step 3: Loading. Alright, now you should have a filament-free Lulzbot. The machine should already be preheated, and the spring loaded-clasp should be open. All you have left to do is load the new filament and you’ll be ready to print! Here’s what you need to do:

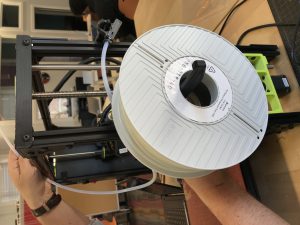
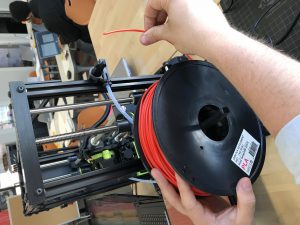
  • First, load your filament spool onto the machine. The spool should be loaded so that the loose end of the filament is facing the back of the printer. (See photo)

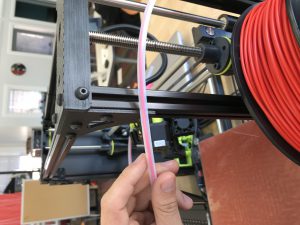
  • Load the filament through the plastic tubing

  • Now, you should feed the filament into the extruder head- you’ll know it’s in far enough once you see filament coming out of the extruder

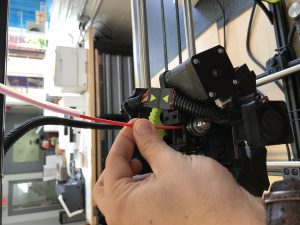
  • Use the spring-loaded clamp to lock the filament in place

  • Now you want to make sure any old material is out of the extruder before you start printing. In Matter Control go to CONTROLS and press MOVEMENT then EXTRUDE. Repeat this step until only the new filament is coming out of the extruder.

That’s it! You should be ready to start printing!

Getting Started: Adobe Illustrator

Adobe Illustrator is an incredible software program that allows you to do all kinds of things; ranging from digital art to logo design. AI has a ton of features for you to explore! Once you get the hang of it, you’ll be able to create all kinds of designs for your business. Below are a few of resources to help you get started:

https://www.youtube.com/watch?v=xhCXiN87jQQ

Illustrator Handout

Download the above handout to learn the names of the basic Illustrator tools. This will help you follow along with the tutorial videos! The video below covers all of the basic tools in more depth.

Design a City Skyline

This design challenge will help you master the Shape tool by creating a city skyline!

Design Clouds (and Pacman!)

This design challenge will teach you how the Shapebuilder tool can be used to make Pacman (and lots of other cool things too)!

This is just the start! There are lots of great free Illustrator tutorials available on YouTube and other sites. If there’s a specific skill you want to learn; there’s probably a video out there for you!

Getting Started: Lulzbot 3D Printer

Looking to test the waters of 3-D printing, but not sure where to start? This guide is for you. Follow these simple steps and you’ll be well on your way to printing using the Lulzbot Taz 6!

Step 1: First things first; you’re gonna need a design! You can either create your own using TinkerCAD or another CAD software or find a design you’d like to print on Thingiverse!

TinkerCAD is a free online CAD program that allows you to build your own designs using shapes! They have lots of great tutorials on their site that will help you get started. Create a free account and check it out! You should do all of the free tutorials to get a good understanding before making your own designs. 
Thingiverse is a site that has thousands of 3-D designs that you can download and print; they have just about everything! Head over to their site and find a design you’d like to print. 

Step 2: Save your file to the TPP File Server. Make sure your file is saved in STL format or GCODE created for Lulzbot! 

Step 3: Turn on the 3-D Printer and check to see if the right filament is loaded.

Helpful Hint!

Not the right filament? Check out this article on how to change/load filament!

Step 4: Pull up your design on Matter Control (use the tablet or computer that is attached to the printer)

> In Matter Control find QUEUE, then hit ADD (find your design from the server)

Step 5: Make sure you have the right print settings in Matter Control and then you are ready to print your new design!

> In Matter Control find SETTINGS then click on MATERIAL (make sure the material matches whatever filament you are using) then hit PRINT

Now all you have to do is wait! Before long your design will be printed. Make sure you shut off the 3-D after you are done using it.

Glowforge Tutorial: Going from Sketch to Cut

Do you have a handdrawn design that you want to laser-cut, but don’t want to deal with the hassle of converting it to a digital file? Have no fear! The Glowforge is able to take a photo of your hand-drawn designs and convert them into digital files, so that you can go from sketch to cut in a matter of minutes! Follow the steps below, and you’ll have your new laser-cut treasure in no time.

Safety First!

STOP RIGHT THERE! Remember to never walk away from the Glowforge while the machine is on. Locate and attach the ventilation fan. Double check that the fire blanket is nearby. Make sure to turn off the Glowforge once your design is done. 

Step 1: Draw Something! The first thing you need to do is draw your design. It could be a new logo for your business, a sketch of your pet rat, or a hand-written letter to send to your grandma for her birthday– it’s up to you! Just draw something! Anything!

Step 2: Login to the Glowforge site –> app.glowforge.com

Step 3: Turn on the Glowforge (power switch is on the back).

Step 4: Place your design in the bed of the laser cutter (see photo).

Step 5: On the Glowforge site, click the “Trace” button in the top left corner of the screen.

Step 6: The app will ask you to draw a square around the design you want to trace.

Step 7: The app will ask you to select any white space you want to remove (this is how you tell the Glowforge you want to cut around the edge of your shape). Once you have clicked the white space, a purple “cut line” will appear around your shape. Make sure it is correct before moving to the next step.

Step 8: Press the “Place artwork” button in the top right corner of the screen.

Step 9: Remove your hand-drawn design from the bed of the Glowforge, and replace it with the material you want to cut (we recommend using Proofgrade materials).

Step 10: Refresh the bed image, by clicking the gear icon on the far-right side of the toolbar and selecting “refresh bed image.” Now you should be able to see your material in the bed.

Step 11: Drag and drop your design to wherever you want to place it on the material. You can resize or rotate if needed.

Safety First!

STOP RIGHT THERE! Before you go any further, make sure you have attached the ventilation fan and it is turned on!

Step 12: If you’re happy with the placement of your design you should be ready to cut. Press the “print” button on the top right corner of the screen.

Step 13: Once the Glowforge is ready to cut, the blue print button on the machine will start flashing. Press that button, and let the cutting begin!

Safety First!

Make sure you are watching the Glowforge for the entire time it is cutting. If you see the material begin to catch fire, open the lid and use the wool fire blanket (located next to the machine) if needed.  

Once the Glowforge is done cutting you can open the lid and appreciate the beauty of your hand-drawn, laser-cut creation!

Safety First!

STOP RIGHT THERE! Remember to turn off the machine and disconnect the ventilation if you are done using it. 


How to Make a Keychain w/ the Glowforge

Is your key ring looking a little bland? Lacking personality? You’ve come to the right place! This tutorial will help you use a laser cutter to design your own keychain to impress all your friends.

Safety First!

STOP RIGHT THERE! Remember to never walk away from the Glowforge while the machine is on. Locate and attach the ventilation fan. Double check that the fire blanket is nearby. Make sure to turn off the Glowforge once your design is done.

Step 1: You will need to design a basic keychain on Adobe Illustrator. Make sure to add a keyring hole! (see example below).

Step 2: If you want to customize your design in Adobe Illustrator with your name, or some other design, you can do that now. (see below)


Helpful Hint!

 If you are trying to engrave words on the Glowforge, make sure you convert your text into shapes, or the Glowforge will not recognize them! (To do this: right click the text, then press “create outlines”)

Step 3: Now you have your keychain design ready to go! Save it as a .svg file, and head over to the glowforge site: app.glowforge.com

Step 4: Turn on the Glowforge (power switch is on the back).

Step 5: Choose the material you want to use and place it inside the Glowforge. (We recommend using Proofgrade materials)

Step 6: On the Glowforge app, you will see a button in the top left corner that says “Upload.” Press that button and look for the .svg file you just created!

Step 7: Now you can easily drag and drop your design to the place you want to cut. (See below)

Step 8: Select whether you want to “Cut” or “Engrave” different sections. For this keychain I have selected to “cut” the outline/keyring hole, and “engrave” the text. Since I am using Proofgrade materials, the Glowforge automatically knows what settings to use! (See above)

Tip:

  If the bed image displayed on the Glowforge isn’t up-to-date, you can refresh the image by clicking on the Gear icon in the toolbar and pressing “refresh bed image.”

Safety First!

STOP RIGHT THERE! Before you go any further, make sure you have attached the ventilation fan and it is turned on!

Step 9: You’re ready to cut! Press the “print button in the top right corner.”

Step 10: Once the Glowforge is ready to cut, the blue print button on the machine will start flashing. Press that button and let the cutting begin!

Safety First!

Make sure you are watching the Glowforge for the entire time it is cutting. If you see the material begin to catch fire, open the lid and use the wool fire blanket (located next to the machine) if needed.  

Once the Glowforge is done cutting you can open the lid and take out that sweet new keychain! Nice work.

Safety First!

STOP RIGHT THERE! Remember to turn off the machine and disconnect the ventilation if you are done using it.