Author Archive

Heat Press: How To Guide

Getting Started:

Welcome to Heatpress: How to Guide! At this point, you should have printed your design on sublimation paper or cut out the design on vinyl. More articles on the Vinyl Cutter here.

Safety First!

STOP RIGHT THERE!

  • NEVER walk away from the heat press while using
  • ALWAYS turn off heat press when you’re done
  • Always use Teflon sheets (or other non-stick sheets) on both sides of materials so graphics/inks don’t stick to the heat press
  • Double-check temperature and time settings to avoid burning

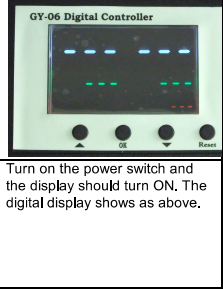
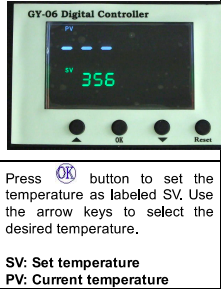
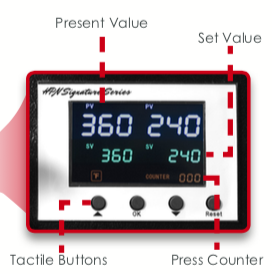
Step 1: Turn it on! Turn the Heat Press on using the red button on the left of the base.

Step 2: Set Temperature and Time. As the Heat Press is heating up, you’ll see a few different numbers and colors. On the left side of the screen, PV stands for Current Temperature and SV stands for Set Temperature. On the right, PV stands for Current Time and SV stands for Set Time. These are important to change and watch when pressing with different materials.

Before anything else, take a look at this article for temperature and time settings based on the material you’re using.

Step 3: Teflon Sheets. Once the timer and temperature are set to your specific materials, it’s time to press! Place the Teflon sheet on the bottom of the Press, your material on top then the other Teflon sheet. This will ensure the vinyl or sublimation paper does not stick to the Heat Press, ruin the machine and your product.

Step 4: Press it!

Safety First!

STOP RIGHT THERE! Hold the Handle. Remember, DO NOT LEAVE the Heat Press unattended. Be sure to hold onto the handle the entire time, even though the machine automatically lifts after the timer is done; it’s best to have control of the Heat Press.

Step 5: Let It Cool. Let your material cool for a moment before putting it to the side and removing the vinyl (if pressing with vinyl paper) so you don’t burn yourself.

Step 6: Repeat. Remain with the Heat Press while it is on and prepping your next product.

Step 7: Turn it off!

Safety First!

STOP RIGHT THERE! Once you are done, TURN OFF THE HEAT PRESS. It is incredibly important that you DO NOT LEAVE THE HEAT PRESS ON after you leave.


Have questions or comments? Write them in the comment section and we’ll respond as soon as we’re able.

Heat Press: Deciding on Temperature and Time Settings

At this point, you’ve made your design on Adobe Illustrator and you’ve decided on whether you’re using Sublimation Paper or Vinyl. In this article, we’ll talk about what is the best temperature and press time for your materials. Here are the typical materials we buy for students to use on their popular fabric products. If you are pressing on something other than fabric, this is a great opportunity to research any settings that need to be adjusted. To learn more about the Heat Press and how to use it, check out this document! Information about the paper and vinyl are linked below:


Vinyl: EnduraTEX RESOLVE Plus

Material Temp Time Peel Mirror
Fabric 300F 20 sec Cold yes


Sublimation Paper

Material Temp Time Peel Mirror Note
Fabric (Polyester, Cotton) 400F 25-45 sec Yes
Metal 400F 40-60 sec Yes Remove plastic

Heat Transfer Sticker: Laser 1 Opaque Laser Paper

Material Temp Time Peel Mirror
Fabric 350F 15-20 Cold No


Paropy CL HS: Wood and Leather

Material Temp Time Peel Mirror
Leather 300 50 sec Hot yes
Wood 300 50 sec Hot yes

Want to see how to press a transfer onto a specific product? Check out our videos linked here, which shows you how to decorate substrates step-by-step.