
Just started a sticker business? Need labels for that new beauty product? Just want to get that amazing new logo on your packaging? Look no further.
Step 1: Adobe Illustrator. Open Adobe Illustrator (AI) and have the design (label, logo, etc.) handy in a separate AI document.
Step 2: Changing Your Artboard Size. In this new AI document, make sure your artboard is 8.5in in width and 11in in height by using the Artboard Tool (Shift+O).
![]()
Step 3: Roland CutStudio. Open up the Roland CutStudio extension by going to the top bar and clicking “Window” > “Extensions” > “Roland CutStudio”
Step 4: Adding Crop Marks. Once the Roland CutStudio extension opens, click the drop-down menu located in the upper right corner of the extension.

Click “Crop-marks…” which will open a new box. On the top of this new box you’ll see “Type:” next to a drop-down menu. Make sure this drop-down menu lists the name of the vinyl cutter you are using. For the Cambridge MakerLab, that would be the GS-24.
Once you select the proper vinyl cutter model, click the “OK” button
On the Roland CutStudio extension, you want to click the Crop-marks button.
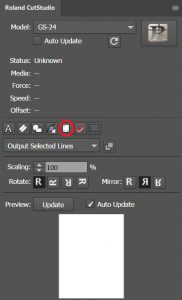
3 dots should appear on your artboard.
3 dots should also appear on the bottom part of the Roland CutStudio extension, along with a gray box. If you can’t see this, drag the bottom of the extension box down until it is visible.
Step 5: Adding Artwork. Now you’re ready to fill the artboard with your stickers!
Select the shape you would like your stickers to be cut into, create that shape on your artboard and change the size of that shape to meet your needs using the “Transform” button.
![]()
Once you have created the shape and size of your sticker outline, place or create the text or design you want inside the sticker outline.
Once everything is placed where you’d like it, select the outline AND the design or text inside the outline and right click. Select “Group”.
You’ll notice when you click your grouped sticker, the outline pops up in the gray box on the Roland CutStudio extension. This tells you what the Roland CutStudio software can identify and cut. Your shapes must fit inside this gray box in order to be cut by the vinyl cutter.
Copy (Ctrl+C) and Paste (Ctrl+V) this grouped sticker and fit as many copies as you can on your artboard that will fit inside the gray box on the Roland CutStudio extension. Fill the page even if you don’t need that many stickers right now, because you might need them in the future and the leftover sticker paper will be thrown out anyway.
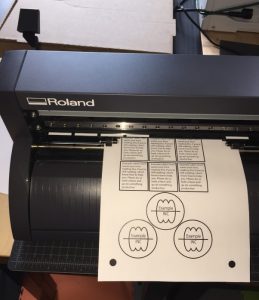
Once you’ve finished, it should look something like this:

Step 6: Double Check Your Cut Lines. Notice how the example stickers are packed tightly, but do not overlap. Also notice how none of the shapes are outside of the gray box in the Roland CutStudio extension. Finally, notice how only circles and rectangles appear in the gray box. This is because I only want to cut the outlines. If shapes appear inside your sticker outlines that you do not want to cut, you may need to right click on your stickers and click “Ungroup” then hold shift as you select only the sticker outlines.
Step 7: Print Your Stickers. Once your sticker layout is complete, you’re ready to print! Consult the printing guide to help you make a clean print from the printer of your choice. For best quality at the MakerLab, I recommend the Canon ImageRunner.
Now that you’ve printed your stickers, you’re ready to cut!
Step 8: Ready to Cut! Turn on your vinyl cutter.
Step 9: Positioning Sticker Paper. Place your sticker paper under the rollers and move your rollers (easiest to do from the back) so that they are on the edges of your sticker paper and also under a white strip. Make sure your sticker paper is loaded straight so that the rollers can move up and down the page.
Once positioned properly, pull the lever on the left of the machine to drop the rollers and clamp your page into the vinyl cutter.
Step 10: Adjusting Settings. Use the Up/Down buttons on the right side of the machine and scroll until you see “Piece” appear on the vinyl cutter screen.

Then press the “Enter” button. The machine should start to move and eventually measurements should appear on the vinyl cutter screen.
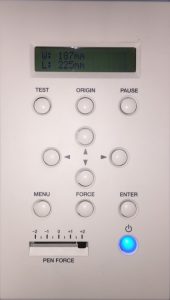
Step 11: Choosing Your Pen Force. Notice in the lower left corner of the above image there is a switch labelled “Pen Force”. This determines how deep the vinyl cutter will cut. Typically “0” will do the trick. If you notice your stickers didn’t get cut all the way through, consider increasing the pen force. If you notice the vinyl cutter shredded your stickers, consider decreasing the pen force.
Step 12: Vinyl Cutter to Computer. Connect the USB cord attached to the vinyl cutter into your laptop.
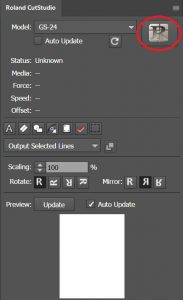
Step 13: Roland CutStudio. Select all of your stickers, making sure only the lines you want to be cut appear in the gray box on the Roland CutStudio extension.
Click the large “R” button in the top right of the Roland CutStudio extension.
A new box should pop up with a white grid and the outlines of your stickers (if it doesn’t, check the bottom of your screen and click the Roland CutStudio icon to bring it up). This is the Roland CutStudio software that works with the vinyl cutter.
Double check that the shapes in this new box are exactly what you want to be cut.
Step 14: Time To Cut! Click the “Cutting” button on the top of the box.
![]()
A new box will pop up. Make sure that in the “Printer” section of this box, the model of the vinyl cutter you are using is listed next to “Name:”. If it is not, click the “Change…” button on the bottom of the box. Another box will appear. Click the drop-down menu next to “Name(N)” and select your vinyl cutter. Then click “OK”.
Click “OK” and your cut should proceed!
Step 15: Your Design Is Ready! Once the vinyl cutter stops cutting, push the lever back to unclamp your paper, pull your paper out of the machine, and click the left arrow button on the machine to reset it for the next cut.
You can close the Roland CutStudio software and click “No” when it asks you if you want to “Save Changes”.
Make sure to save your AI document to the server so you can print and cut these stickers whenever you need them.
You’re done! Great job! Enjoy your stickers!
1 Comment
Note that while the PEN FORCE slider on the vinyl cutter is slid all the way to +2 in these photos, chances are you’ll get best results setting it to the middle at 0.
1